that was it !
with the --flash_size=32m option i can flash it even at --baud 460800
MicroPython v1.8.7-205-g181f7d1 on 2017-02-09; ESP module with ESP8266
Type "help()" for more information.
>>>
Thank you!
.F
1.8.7 fails to install
Re: 1.8.7 fails to install
Hi All...
I am also having problems flashing the MicroPython firmware (v1.8.7) on to my several Amica Brand NodeMCUs bought through Banggood (a Guangzhou, China based supplier of electronic parts). I have successfully installed MicroPython on several other brand ESP8266 boards including Adafruit Feather ESP8266 boards, WeMos D1/"R1" ("retired" (but still very available)) boards, and the WeMos D1/R2 boards. I also have LoLin NodeMCU board, but have not tried them with MicroPython yet (may do so soon). After failing to install MicroPython on several Amica boards, I went back and checked the functionality of the boards by compiling and running several Arduino C programs and they seem to work fine. I even installed a web-server app complete with a complex HTML/CSS web page, and it works. So, I am confident that these boards are otherwise working.
Also, "jwissing" had asked what the "-fm dio" option do? My best guess is that it enables the Dual-I/O SPI Flash memory mode, which is supposed to free-up two of the six GPIO pins used by the ESP8266 to address its flash memory. The trade-off is speed for two additional GPIO pins (GPIO9 & GPIO10). The default flash memory address mode of the ESP8266 is "Quad-I/O SPI". So, now I am wondering if there is a "-fm qio" option that enables quad I/O. You might give that a try. I will also give both "-fm dio" and "-fm qio" a try. I also remember another ESP8266 formatting too which had an option that would allow you change between quad I/O SPI and dual I/O SPI. If I can figure out what program that was, I will test it and get back here with my results.
Addendum: This "mod" also requires a hardware 'fix' that according to some Internet article I read over a year ago requires opening the ESP12 module's metal shield, making a couple trace cuts and jumpers which requires superhuman solder skills (and eyesight), which is why I never tried it. I have heard though, that some Chinese ESP8266 board vendor was going to offer boards with this mod made (perhaps Esspressif is now offering OEMs a version of the ESP8266 with the fix already made ). Whatever the case, Dual-I/O SPI requires both hardware and software support to pull it off. In my book, its not a well supported option.
Last edited by randmor on Sat May 27, 2017 12:50 pm, edited 4 times in total.
Re: 1.8.7 fails to install
Oh, I didn't see that last post before mine on the second page worth of posts.
So, you say adding "--flash_size=32m" worked for you?! That's great. Let me try that first!
So, you say adding "--flash_size=32m" worked for you?! That's great. Let me try that first!
Last edited by randmor on Sat May 27, 2017 2:21 am, edited 1 time in total.
Re: 1.8.7 fails to install
Yes, I can confirm that the "--flash_size=32m" and "-fm dio" options work. Here's what I did:
My system is a $200 Intel based Chromebook running Crouton/Ubuntu Linux v.14.04
# Step 1: Erase Flash Memory on NodeMCU ESP8266 SoC:
(trusty)randmor@localhost:~$ esptool.py --port /dev/ttyUSB0 erase_flash
esptool.py v1.3
Connecting....
Running Cesanta flasher stub...
Erasing flash (this may take a while)...
Erase took 2.4 seconds
(trusty)randmor@localhost:~$
# Step 2: Flash latest "stable" version of MicroPython onto NodeMCU ESP8266 SoC:
(trusty)randmor@localhost:~$ esptool.py --port /dev/ttyUSB0 --baud 460800 write_flash --flash_size=32m -fm dio 0 esp8266-20170108-v1.8.7.bin
esptool.py v1.3
Connecting....
Running Cesanta flasher stub...
Flash params set to 0x0240
Wrote 589824 bytes at 0x0 in 12.8 seconds (367.7 kbit/s)...
Leaving...
(trusty)randmor@localhost:~$
# The flash process seemed to complete okay. Now, use PuTTY to access MicroPython REPL...
(garbage)#4 ets_task(40100164, 3, 3fff8398, 4)
could not open file 'main.py' for reading
MicroPython v1.8.7-7-gb5a1a20a3 on 2017-01-09; ESP module with ESP8266
Type "help()" for more information.
>>>
>>> vfs.listdir()
['boot.py']
>>> dir()
['uos', '__name__', 'gc', 'bdev', 'vfs']
>>>
# Looks like it worked! But, I still question the wisdom of using "-fm dio" because if it is
# indeed the way you specify running the ESP8266 SPI mode (Dual-IO or Quad-IO)
# then the ESP8266 speed may suffer with Dual-IO. I'll try it again both without "-fm dio"
# and with "-fm qio".
Last edited by randmor on Sat May 27, 2017 2:55 am, edited 3 times in total.
Re: 1.8.7 fails to install
I took out "-fm dio" and the original "wild garbage dumping storm" symptom reappeared. Here's the commands I used:
esptool.py --port /dev/ttyUSB0 erase_flash
esptool.py --port /dev/ttyUSB0 --baud 460800 write_flash --flash_size=32m 0 esp8266-20170108-v1.8.7.bin
So, "-fm dio" does appear to play a key role in the fix.
Now to try "-fm qio"... No good. While esptool.py does not complain and seems to complete the job, when I go in with PuTTY, the same "wild garbage dumping storm" symptom appears. Here are the commands I tried:
esptool.py --port /dev/ttyUSB0 erase_flash
esptool.py --port /dev/ttyUSB0 --baud 460800 write_flash --flash_size=32m -fm qio 0 esp8266-20170108-v1.8.7.bin
Now to see "-fm dio" fix the problem again:
esptool.py --port /dev/ttyUSB0 erase_flash
esptool.py --port /dev/ttyUSB0 --baud 460800 write_flash --flash_size=32m -fm dio 0 esp8266-20170108-v1.8.7.bin
Yup, MicroPython's REPL is working again!
I suspect that since most ESP8266 chips are set up to run flash memory in Quad-I/O mode, the esptool.py must assume this by default (and perhaps accepts and uses the explicit command "-fm qio" -- at least it does not choke over it). The Banggood/Geekcreit® /Amica brand NodeMCU boards must have had their ESP8266 chip modified to support Dual-IO mode. If this is so, it would explain why MicroPython fails when you use the standard esptool.py command to flash the chip. If this is the case (and may explain the weird "Geekcreit" label?!), then there should be two additional GPIO pins you can use w/o crashing your system. As I recall, these are GPIO9 and GPIO10, but let me verify this by checking my notes... Yes, my notes do say GPIO9 and GPIO10 are freed up with ESP8266 chips that have been modified to use Dual-IO SPI for flash memory addressing. I also found another thread on this topic at GitHub's forum. Here's that URL/Link: https://github.com/nodemcu/nodemcu-firmware/issues/809
The GitHub post/response by jmattsson on Dec 1, 2015 pretty much sums up our findings:
"Are you flashing with DIO mode? The devkit 1.0 hardware changed from the old QIO (quad IO lines to/from the flash chip) to DIO (dual IO lines) in order to free up two more pins for GPIO. Flashing in QIO mode means things don't boot. So, if your esptool isn't already set to DIO by default, try adding -fm dio to the write_flash command."
esptool.py --port /dev/ttyUSB0 erase_flash
esptool.py --port /dev/ttyUSB0 --baud 460800 write_flash --flash_size=32m 0 esp8266-20170108-v1.8.7.bin
So, "-fm dio" does appear to play a key role in the fix.
Now to try "-fm qio"... No good. While esptool.py does not complain and seems to complete the job, when I go in with PuTTY, the same "wild garbage dumping storm" symptom appears. Here are the commands I tried:
esptool.py --port /dev/ttyUSB0 erase_flash
esptool.py --port /dev/ttyUSB0 --baud 460800 write_flash --flash_size=32m -fm qio 0 esp8266-20170108-v1.8.7.bin
Now to see "-fm dio" fix the problem again:
esptool.py --port /dev/ttyUSB0 erase_flash
esptool.py --port /dev/ttyUSB0 --baud 460800 write_flash --flash_size=32m -fm dio 0 esp8266-20170108-v1.8.7.bin
Yup, MicroPython's REPL is working again!
I suspect that since most ESP8266 chips are set up to run flash memory in Quad-I/O mode, the esptool.py must assume this by default (and perhaps accepts and uses the explicit command "-fm qio" -- at least it does not choke over it). The Banggood/Geekcreit® /Amica brand NodeMCU boards must have had their ESP8266 chip modified to support Dual-IO mode. If this is so, it would explain why MicroPython fails when you use the standard esptool.py command to flash the chip. If this is the case (and may explain the weird "Geekcreit" label?!), then there should be two additional GPIO pins you can use w/o crashing your system. As I recall, these are GPIO9 and GPIO10, but let me verify this by checking my notes... Yes, my notes do say GPIO9 and GPIO10 are freed up with ESP8266 chips that have been modified to use Dual-IO SPI for flash memory addressing. I also found another thread on this topic at GitHub's forum. Here's that URL/Link: https://github.com/nodemcu/nodemcu-firmware/issues/809
The GitHub post/response by jmattsson on Dec 1, 2015 pretty much sums up our findings:
"Are you flashing with DIO mode? The devkit 1.0 hardware changed from the old QIO (quad IO lines to/from the flash chip) to DIO (dual IO lines) in order to free up two more pins for GPIO. Flashing in QIO mode means things don't boot. So, if your esptool isn't already set to DIO by default, try adding -fm dio to the write_flash command."
Last edited by randmor on Sat May 27, 2017 12:55 pm, edited 1 time in total.
Re: 1.8.7 fails to install
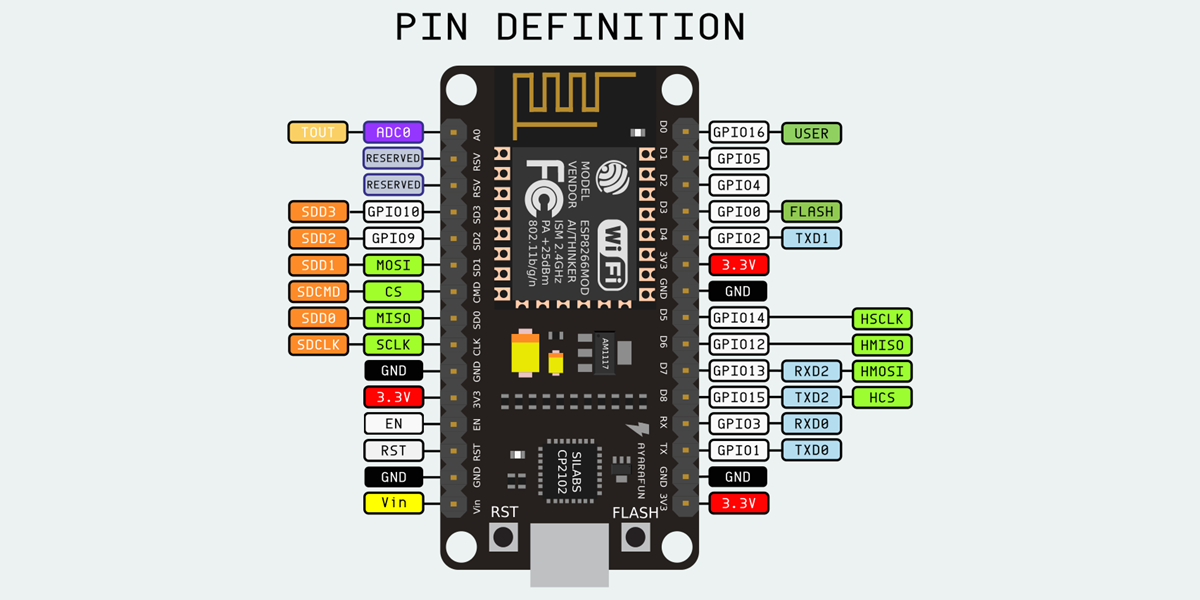
So the next question, which pins on the NodeMCU map to GPIO9 and GPIO10? The answer: GPIO9 = "SD2" and GPIO10 = "SD3". Here is a nice pin-out diagram for the NodeMCU. Now, I am wondering if GPIO9 and GPIO10 can be actually used, or is there something else still using these pins as other folks have reported using Arduino IDE w/ESP8266 Core installed?
To test whether GPIO9 and GPIO10 can be used I attached a 330 ohm resistor and LED between SD2 (GPIO9) and GND, and another 330 ohm resistor and LED between SD3 (GPIO10) and GND. Both LEDs lit-up bright and solidly as though they were in a high state. I then attempted to enter the following script at the MicroPython REPL using PuTTY as my serial terminal emulator.
Unfortunately, as soon as I entered "pin9 = machine.Pin(9,machine.Pin.OUT)", MicroPython would lock up and a moment later the ESP8266 would reset itself and MicroPython would re-awake, but with cleared memory. So, then I tried to test GPIO10 using the following script:
What was interesting is that I was able to enter the entire script and it ran fine. So, it seem we can "get away with" using GPIO10 with MicroPython, but not GPIO9. Has anyone else had good or bad experiences using GPIO9 and GPIO10 with MicroPython on Banggood/Geekcreit/Amica NodeMCU boards? If so, please describe your experience.
To test whether GPIO9 and GPIO10 can be used I attached a 330 ohm resistor and LED between SD2 (GPIO9) and GND, and another 330 ohm resistor and LED between SD3 (GPIO10) and GND. Both LEDs lit-up bright and solidly as though they were in a high state. I then attempted to enter the following script at the MicroPython REPL using PuTTY as my serial terminal emulator.
Code: Select all
import machine
pin9 = machine.Pin(9,machine.Pin.OUT)
import time
for i in range(100):
	pin9.high()
        time.sleep(0.5)
	pin9.low()
	time.sleep(0.5)
Code: Select all
import machine
pin10 = machine.Pin(10,machine.Pin.OUT)
import time
for i in range(100):
	pin10.high()
        time.sleep(0.5)
	pin10.low()
	time.sleep(0.5)
-
pythoncoder

- Posts: 5956
- Joined: Fri Jul 18, 2014 8:01 am
- Location: UK
- Contact:
Re: 1.8.7 fails to install
On many boards GPIO9 and GPIO10 are used to interface to the flash chip.
Peter Hinch
Index to my micropython libraries.
Index to my micropython libraries.
Re: 1.8.7 fails to install
Yes, on most Espressif Systems ESP8266 chips, the flash memory addressing circuit is wired for QIO (Quad-I/O) flash memory addressing. It was maybe a year or so ago that some 'hackers' caught on that you could open the metal box (the RFI shield) around the ESP8266 and make a couple cuts and jumps (assuming you have excellent vision, dexterity and soldering skills) and you could modify the chip for DIO (Dual-I/O) flash memory addressing and thereby gain use of two additional GPIO pins (GPIO9 and GPIO10). However, this mod also needs to be supported in the software development tool chain you are using. Some folks, notably Arduino IDE (with ESP8266 Core installed) have reported problems using GPIO9 and GPIO10. I'm not sure if they ever found a cure, but in their posting, they said there was still activity on these two pins.
Well, besides these relatively few hackers, the cut-throat competition in China has caused at least one ESP8266 NodeMCU board supplier to offer the board with the ESP8266 altered for DIO SPI flash memory addressing. On the 10 Banggood/GeekCreit/Amica boards I have, there are no visible signs that anyone has hacked into ESP8266 chip, so my guess is that either Amica or GeekCreit (whoever they are) has, as an OEM buyer, contracted with Esspressif systems to supply them with DIO SPI enabled ESP8266 chips. I think GeekCreit is another "middleman" in the supply chain from China. They also market another NodeMCU board with the WCH CH340G USB bridge chip rather than the Silabs CP2102, and photos of the underside reveal the board has the DoIT brand label. So, apparently you can buy either Amica brand or DoIT brand NodeMCU boards through the Banggood/GeekCreit supply chain. I still have no idea if the DoIT brand NodeMCUs use DIO or QIO. I also have two Chinese counter-fit Amica NodeMCUs, which you can tell, because the Amica label on the underside of the board have no "N" in the middle of the NodeMCU Logo, and the soldering of the SIP pins is sloppier (hand soldered). Have yet to test them or my two LoLin NodeMCU boards with MicroPython.
Fortunately, esptool.py can handle this DIO vs. QIO SPI flash memory addressing circuit difference and we can successfully use it with MicroPython. For a while there I was thinking I got burned again.
I am hoping to use these in a middle school class I am preparing for next Fall. The school uses a variety of Chromebooks, so my Python options are rather limited. The REPL mode of MicroPython supports "paste mode", so I can essentially cut the Python script from a text editor and paste it into REPL. To do this, use 'Ctrl-e' to enter past mode, followed by 'Ctrl-Shift-v' to paste in the script, and then 'Ctrl-d' to finish paste mode and execute the script. This ability allows me to get around the fact that I can't install/run "ampy", "mpy_upload", or "rshell" (which I'd normally use to copy files down to the ESP8266 file system in order to run them) on these Chromebooks w/o going into 'developers mode', something forbidden by the school district's technical support staff. Otherwise, I'd have them put Crouton and Ubuntu Linux on these machines and then I'd have a rich environment for teaching Python